Repeaters
Repeaters extend the range of a mesh network by receiving and retransmitting signals — ideally from elevated locations with quality antennas. Many radios can be reflashed to act as repeaters: check flasher.meshcore.dev to confirm your device is supported. If it's running repeater firmware, it's a repeater!
Repeaters are still radios — but a radio's role depends on its firmware and placement. A handheld on Vashon may reach a hilltop repeater, which relays the signal to the mainland, and so on. Repeaters placed too close to each other waste range and can cause interference — the goal is thoughtful island-wide placement, an ongoing community effort.
Fixed repeaters have distinct requirements compared to handheld or mobile nodes:
- Elevation and line-of-sight matter more than power — a mountaintop at 22 dBm beats a valley at 30 dBm.
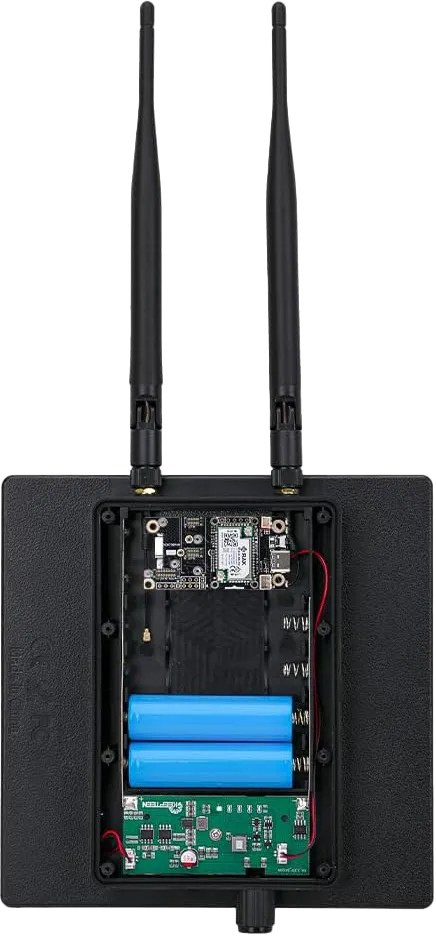
- Robust power — typically solar with battery backup — is essential since many sites lack power; LoRa's low power draw makes this practical with modest 5–10W panels.
- Antennas are fixed, so the main constraint on high-gain fiberglass antennas is cost, not size or portability.
- Reliability matters more than on handheld nodes: maintenance visits to hilltop or rooftop sites are inconvenient, so quality components pay off.
- Finally, remote management is a standard expectation — MeshCore repeaters can be monitored and reconfigured over-the-air through a companion radio - no screen or keyboard needed!
Firmware defines the role. The same hardware can be a companion radio or a repeater — just flash it differently at flasher.meshcore.dev.
Pre-built or DIY?
Pre-built units come fully assembled — antenna, solar panel, battery, and weatherproof enclosure included. Well-matched components and great if you want to mount and forget. DIY builds cost less and allow more experimentation, often starting around $50–80 for parts.
The most popular DIY base is the Heltec LoRa ESP32 V4 (~$20) — it has built-in battery and solar connectors, an OLED display, and can push close to 1 watt (29 dBm). The tradeoff is power: the ESP32 chipset consumes more energy than nRF52840-based boards, making it less ideal for small solar panels.
For the best solar efficiency, XIAO nRF52840 + Wio-SX1262 (~$14 from Seeed Studio) is a community favorite. The nRF platform sips power — nodes can run 24/7 on a 5W panel, though 8–10W gives comfortable margin. Consider buying a bare Wio Tracker Li which does come with a solar panel connector & GPS from Seeed Studio, not Amazon (counterfeit devices and out-of-spec antennas are common on Amazon's LoRa listings).
⚡ Power: 22 dBm vs 1 Watt (30 dBm)
Most LoRa devices transmit at 22 dBm (158 mW). A handful — including the Heltec V4 and PiMesh 1W — push to 30 dBm (1 watt).
The math: doubling TX power adds only ~3 dB, which extends range by roughly 1.4× in free space. Going from 22 dBm to 30 dBm (8 dB gain) translates to about 2.8× range improvement on a clear line-of-sight path.
The tradeoffs: 1W units consume significantly more current and generate more RF noise. In a dense network they can cause more interference than benefit. For most Vashon deployments, a better antenna at 22 dBm will outperform a 1W device with a mediocre antenna.
Real-world numbers: A RAKwireless field test at a 4 km site showed 35% stronger signal retention and 98% packet delivery across five trials using the WisMesh 1W Booster — though a well-sited 22 dBm node with a high-gain antenna can close much of that gap.
Power supply gotcha: The 1W transmitter draws too much current for a 3.3V rail. The RAK13302 module requires an external 5V feed (solar or wall supply) or continuous USB power — a battery alone isn't enough for sustained high-power operation.
Regulatory responsibility: In the US, 915 MHz at 1W is permitted. In the EU, 868 MHz at 1W generally is not. Other countries vary significantly — operators must set appropriate power levels and duty cycles to comply with their local regulations.
Further reading: Why the Meshtastic community loves 1-watt radios (RAK) · WisMesh 1W Booster deep dive (CNX Software)
📡 Sensitivity & Antennas Matter More Than Power
The SX1262 LoRa chip used in most of these devices has a receive sensitivity of –148 dBm — exceptionally good. This means it can detect signals far below the noise floor. The implication: the antenna and its placement matter far more than a few extra dBm of transmit power.
A 7–8 dBi fiberglass antenna at 22 dBm will outperform a stock rubberized whip at 30 dBm. The radiation pattern of high-gain antennas becomes very flat above 7–8 dBi — after that, additional gain squeezes the pattern sideways, which can actually hurt performance when nodes are at different elevations.
See the Antenna Guide → for recommendations and models.
🍓 Raspberry Pi LoRa HATs
Pi-based repeaters run the full Linux stack, which opens up capabilities that bare microcontroller boards can't match:
- Run MeshCore firmware alongside a MeshCore bot in the same unit
-
Manage services via
systemd— the repeater and bot restart automatically after a power outage - SSH remote management — no physical access needed for configuration changes
- Log traffic, monitor uptime, or bridge to the internet (MQTT, etc.)
The tradeoff: a Raspberry Pi draws considerably more power than an nRF52840 node. Pi-based repeaters are better suited for line-powered installations than solar.
Pi HAT Options
- PiMesh 1W — 1-watt LoRa HAT designed for Pi. hamradio.my
- RAK6421 WisBlock Adapter — Mounts RAK WisBlock modules on a Raspberry Pi. RAK Store
- Generic SX1262 Pi HATs — Several options on Amazon: option 1 , option 2 , option 3
See the Bot page → for more on running automated bots alongside your repeater.
📊 Comparison Table
| Device | Pre-built | MCU | GPS | Solar+Batt | TX Power | ~Price |
|---|---|---|---|---|---|---|
| SenseCAP P1 Pro ⭐ | ✅ | nRF52840 | ✅ | Integrated | 22 dBm | $80–100 |
| KEEPTEEN D5L | ✅ | ESP32 | ❓ | Integrated | 22 dBm | $60–80 |
| Atlavox Beacon | ✅ | nRF52840 | ✅ | Optional | 22 dBm | $60–90 |
| PeakMesh Climber | Kit | nRF52840 | ❌ | Solar board | 22 dBm | $40–60 |
| RAK WisMesh Repeater ⭐ | ✅ | nRF52840 | ❌ | Bundle | 22 dBm | $99–299 |
| Station G2 | ✅ | ESP32-S3 | Optional | External | 35+ dBm | ~$65* |
| Heltec V4 (DIY) | ❌ | ESP32-S3 | Optional | Connectors | ~29 dBm | $20–40 |
| XIAO nRF (DIY) | ❌ | nRF52840 | Optional | Add-on | 22 dBm | $50–80 |
* Station G2 availability is unclear as of March 2026 — not currently listed in the UnitEng shop. Check shop.uniteng.com for current status.
Recommended Repeaters
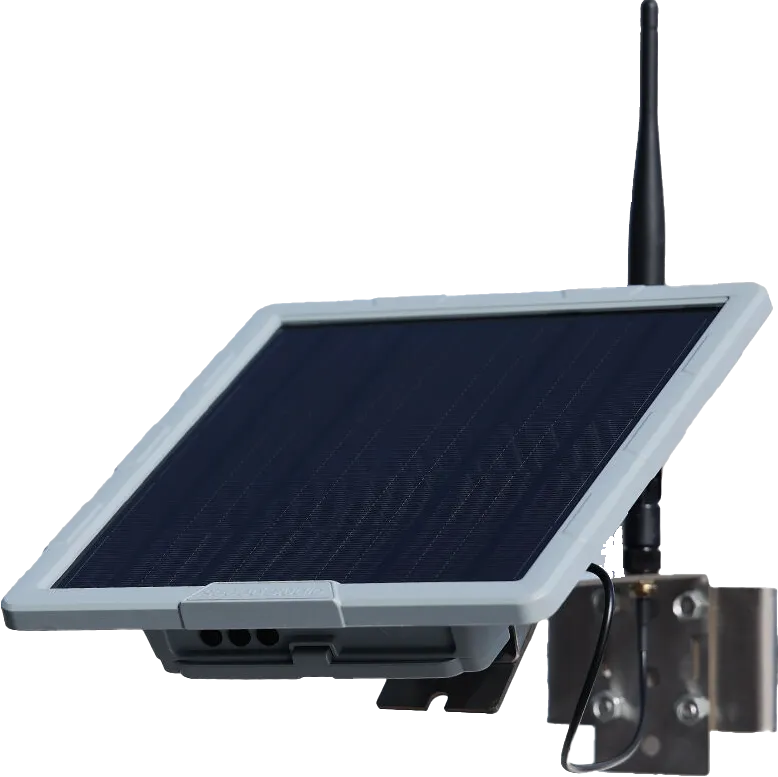
⭐ SenseCAP P1 Pro (Solar Node)
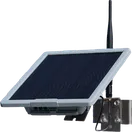
The community's top pick for a deploy-and-forget solar repeater. Pre-built on nRF52840 + SX1262 (22 dBm TX) with GPS, integrated solar panel, and battery in a weatherproof enclosure — around $80–100, nothing to assemble. The nRF platform sips power, so the small built-in panel handles continuous operation. Runs both Meshtastic and MeshCore firmware. Budget extra time for shipping from Seeed. Consider adding a temperature sensor. 15% off deal!
Buy: Seeed Studio
⭐ RAK WisMesh Repeater (RAK10721) (popular — pricier)
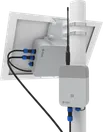
RAK's purpose-built solar repeater in an IP67-rated weatherproof enclosure. Pre-built on nRF52840 (22 dBm TX, no GPS) with wall and pole mounts included. The Solar Battery Lite bundle adds a 5.2 Ah / 56 Wh battery pack and 10W solar panel — a professional-grade, deploy-and-forget installation at $99–$299. More expensive than most options here, but the complete out-of-box solar solution and build quality justify the cost.
Buy: RAK Wireless · Rokland (US)
KEEPTEEN D5L Solar LoRa Repeater
An all-in-one solar repeater on ESP32 (22 dBm TX) with integrated solar panel in a weatherproof enclosure — around $60–80, nothing extra to source. Well-regarded by the community as a solid plug-and-play option; flash it and deploy.
Buy: Amazon
Atlavox Beacon
A solar-capable outdoor node from Atlavox built on nRF52840 (22 dBm TX), designed for fixed repeater installations. Clean weatherproof enclosure with GPS included and optional solar charging, around $60–90.
Buy: atlavox.com
PeakMesh Magnet Climber
A compact kit-form solar repeater on nRF52840 (22 dBm TX, no GPS) that mounts magnetically — great for attaching to metal poles, fence posts, or equipment. Includes a solar charging board; around $40–60.
Buy: Etsy — PeakMesh
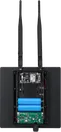
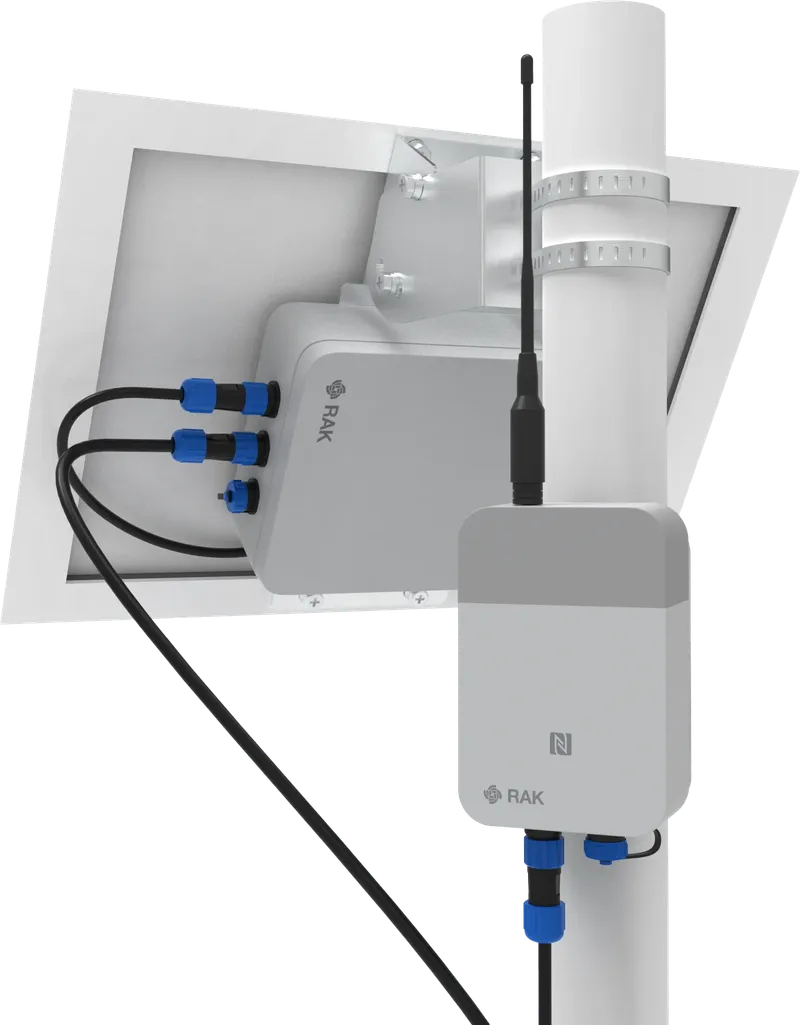
UnitEng Station G2 — Regional Super Repeater
The hardware behind our regional backbone nodes including Cougar Mountain. The Station G2 (by B&Q Consulting, Shenzhen, China) is a professional fixed-station device built around the Semtech SX1262 with two key RF upgrades over standard LoRa hardware: a dedicated high-power PA (35 dBm P1dB, up to 36.5 dBm / 4.46 W for US915) and an ultra-low noise figure LNA (18.5 dB gain, 1.8 dB NF) that improves receive sensitivity by ~4 dB. A 32MHz TCXO (±1.5 ppm) enables reliable operation at extreme LoRa spreading factors. The ESP32-S3 (16MB flash, 8MB PSRAM) provides WiFi, Bluetooth 5.0, and a 1.3″ OLED screen, with optional GPS and I2C sensor expansion via GROVE and QWIIC connectors.
Powered by 15V USB-C PD or 9–19V external supply — the PA is only active at ≥9V; standard 5V USB limits output to ~22 dBm. Higher power draw in RX mode than nRF52840 boards, so plan for 15W+ solar.
Availability note: The Station G2 is not currently listed in the UnitEng shop as of March 2026. Check shop.uniteng.com or Tindie for current status. Wiki: wiki.uniteng.com
Heltec LoRa ESP32 V4 (DIY)
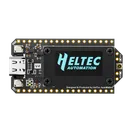
The go-to DIY repeater base — ESP32-S3 with SX1262 LoRa (~29 dBm TX). Built-in OLED display, battery connector, solar input connectors, WiFi and BLE for easy setup; GPS optional. Around $20–40. The tradeoff for solar: the ESP32-S3 draws considerably more current than nRF boards — plan for a 10W+ panel. Excellent for testing firmware and experimenting before committing to a permanent install.
Buy: Heltec
XIAO nRF52840 + Wio-SX1262 (DIY — ultra-low power)
The community's preferred ultra-low-power DIY option — nRF52840 + Wio-SX1262 (22 dBm TX, no GPS) at just $14–20 for the board pair. Add a RAKwireless solar panel, a PeakMesh charge board, and an IP65 junction box for a complete solar repeater under $60. Nodes run 24/7 on a 5W panel.
Buy: XIAO nRF52840 + Wio-SX1262 kit
🔧 Flashing: USB First, Then OTA
The first flash must be done over USB using the web flasher at flasher.meshcore.dev. Connect the device via USB, select Repeater firmware, and follow the prompts. Start with the normal browser flow first; only enter manual bootloader mode if auto-detection fails (for ESP32, hold BOOT and tap RESET).
After the initial flash, subsequent updates can be done wirelessly:
- nRF52840 devices: Use the nRF Toolbox app (Android/iOS) — Nordic DFU protocol over BLE.
- ESP32 devices: OTA update via WiFi — connect to the
device's WiFi AP and follow the update prompt at
192.168.4.1.
You can only connect to a repeater through a companion radio — repeater BLE and WiFi are turned off to save power after initial setup. Make sure to advertise while connected via USB so your companion has the repeater in its contacts. Configuration: config.meshcore.dev
For troubleshooting USB connection issues, see the Flashing Guide →
📍 Placement & Coverage
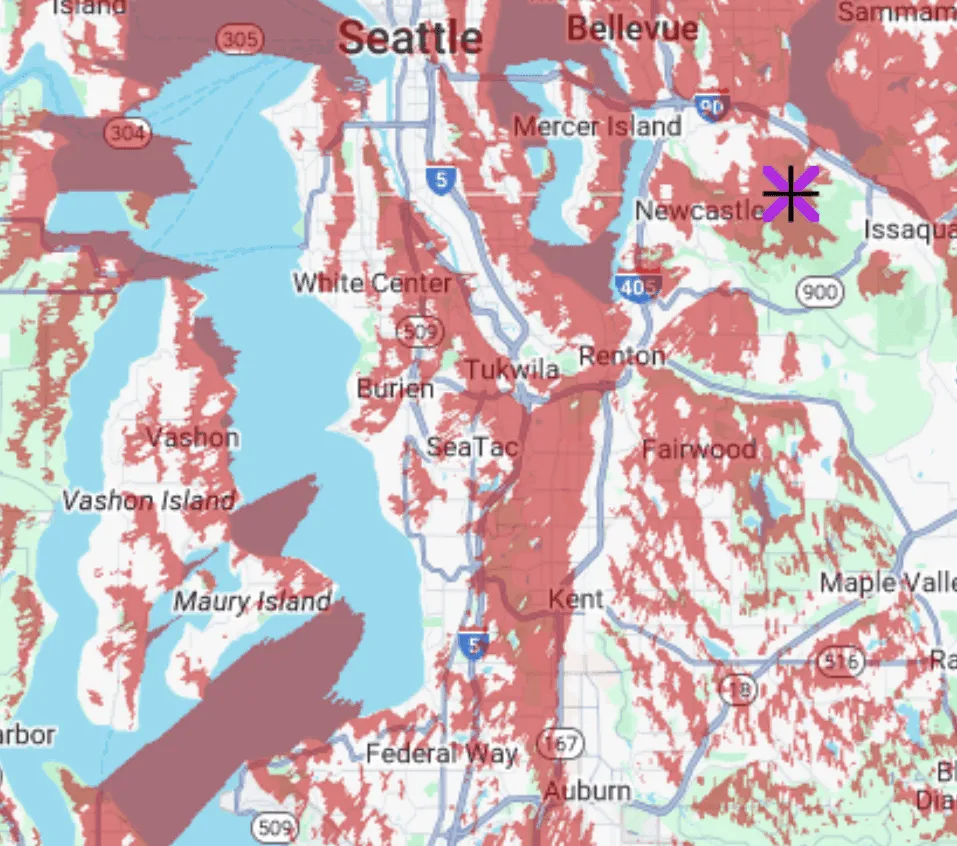
This coverage map from pugetmesh.org shows Cougar Mountain's reach across the Puget Sound region — illustrating why elevation and line-of-sight matter far more than raw power.
Key considerations for fixed installations:
- Elevation wins — a mountaintop at 22 dBm beats a valley at 30 dBm
- Solar + battery — no grid needed; 8–10W panel for nRF boards, 15W+ for ESP32
- Fixed antennas — plan the direction intentionally; 7–8 dBi fiberglass is a sensible ceiling
- Remote management — MeshCore repeaters have no screen/keyboard; manage via companion radio
- GPS off — repeaters are fixed; GPS can be disabled to save power (details)
- Spacing — don't co-locate repeaters; plan for island-wide coverage, not local overlap
See also: PugetMesh's Repeater Setup Guide, Alan Dieringer's advice on repeater names, our Antennas page also has a section on planning regional antenna placement.
Repeater Device Catalog
Community-vetted repeater hardware. Click any device for detailed specs, firmware options, and setup guides.
WisMesh Repeater
RAK WisMesh Repeater (RAK10721)

MeshSolar
Heltec MeshSolar / MeshTower

WisBlock
RAK WisBlock / WisMesh (RAK 4631)
SenseCAP Solar
Seeed Studio SenseCAP Solar

Station G2
UnitEng Station G2
KEEPTEEN D5L
KEEPTEEN D5L Solar LoRa Repeater